Baking Tips
I love to cook and bake for my family. Desserts are my favorite and I thought I'd pass along some baking tips that I've learned over the years that help make my scratch cooking all the better.
1. Always use an oven thermometer. Most baking failures are due to faulty oven temperatures. How do you know your oven is ~really~ at 350 degrees unless you have an oven thermometer? Be sure to get one and leave it in there!
2. For lighter, fluffier made from scratch cakes ~ the key is to have all ingredients at room temperature.
3. The purpose of creaming butter when making a cake from scratch is to get air into the butter. This takes time. Don't rush it.
4. When you incorporate sugar into your creamed butter, the goal is to coat every single sugar granule with butter. Again, this takes time. Don't rush it.
5. When adding eggs to your cake batter, add them only one at a time and allow them to mix well.
6. Break eggs into a separate bowl first - it makes it much easier to get out any small shell fragments if necessary. And, if you use farm fresh eggs like we do, on the slight chance you gathered one that is a little old, you won't ruin your whole recipe!
7. Cakes that are too high when baked are that way because your oven was too hot.
8. Cakes that are sunken when baked are that way because your oven was too cool - or- You Peeked Too Much (that's why most ovens have a door with a window and a light - be sure to peek there instead of opening the door! ;-)
9. Always start out with the lowest baking time and increase only if needed.
10. Cooling racks are an essential in my book and should be sturdy. If you cool a cake directly on the stovetop or countertop you'll end up with a soggy cake bottom.
11. Cake testers are wonderful little devices. You can also use wooden skewers, which are longer than toothpicks and won't get lost in your cake!
12. Be sure to use proper utensils for measuring wet versus dry ingredients. Glass measuring cups with graduated measurements are for Liquids. Measuring cups designated as 1 cup, 1/2 cup, 1/3 cup, 1/4 cup that we're familiar with are for Dry ingredients.
13. Use a pastry cloth for working dough instead of the countertop or cutting board or waxed paper. A pastry cloth is designed to hold flour and keep your dough from sticking without incorporating any extra flour into your dough. If you just use the countertop or other surface, the flour you put there will eventually work into your dough and could make it tough or rubbery. I LOVE my pastry cloth!
Basic Bread Pudding
I experimented a couple of months ago with Bread Pudding, which my family has decided that they really enjoy. Here's how I've made mine through bits and pieces of different recipes:
Bread Pudding
4-5 cups bread cubes
2-3 cups scalded milk
1/4 cup melted butter
1/2 cup sugar
2 eggs, beaten
1/4 teaspoon salt
1 teaspoon grated nutmeg
1 teaspoon cinnamon
1 teaspoon vanilla
1/2 to 1 cup of raisins or dried cranberries or blueberries and/or walnuts to your preference
Lemon Sauce:
1/2 cup sugar
1 Tablespoon cornstarch or arrowroot powder
1 cup hot water
2 Tablespoons butter
3 Tablespoons fresh lemon juice
2 Tablespoons fresh lemon zest
Preheat oven to 350 degrees. Lightly grease a 1-2 quart baking dish.
In a large bowl, place bread cubes. Heat milk until steam starts to rise from the pan, but do not boil. Pour scalded milk over bread cubes.
In a separate bowl blend all other ingredients. Add to bread cubes and milk and lightly combine. You don't want the bread to turn to mush.
Pour into baking dish and bake for 40-45 minutes or until a knife inserted in the center comes out clean.
You can bake in a steam bath if you prefer - I've baked mine this week with and without a steam bath and it turned out fine both ways.
Before serving, make the sauce:
Put all ingredients into a saucepan and heat until thick and bubbling. Pour or spoon over individual servings of bread pudding.
Baked Pumpkin Pudding
After dinner one night I was in the mood for dessert, something a little sweet but not too much. Something like a custard or pudding ~ but I was out of milk! So, I searched Allrecipes.com for a custard to make with evaporated milk. I found one for Baked Pumpkin Pudding that I altered. Here's how I made it:
Baked Pumpkin Pudding
1 egg
2 cups canned pumpkin
1/2 cup sugar
1 Tablespoon honey
1 teaspoon ground cinnamon
1/2 teaspoon ground ginger
1/4 teaspoon ground nutmeg
1 1/2 cups evaporated milk
Preheat oven to 425 degrees.
Beat all ingredients in a bowl until well blended. Lightly coat 5-6 ramekins with no-stick spray. Evenly pour pumpkin mixture into ramekins. Line the bottom of a 9 x 13 or larger baking pan with a dishtowel. Place ramekins on the towel and fill pan to 1/2 way up ramekins with boiling water.
Place in oven and bake at 425 degrees for 10 minutes. Reduce heat to 350 degrees and bake for 30-35 minutes longer or until set in the middle.
Cranberry Orange Bread Pudding
A few days ago, after dinner we were all in the mood for a warm, filling dessert. Cranberry Orange Bread Pudding is what I made - here's the recipe:
About 4 cups or so of crumbled bread (in large pieces)
2 cups scalded milk
2 eggs
1/2 cup sugar
1/2 teaspoon grated nutmeg
1/2 cup dried cranberries
Zest of a whole orange
Dash of vanilla
Preheat oven to 350 degrees. Grease a 1 1/2 to 2 quart casserole dish and set aside.
In a large bowl, crumble the bread (I used whole wheat). Sprinkle in the dried cranberries and set aside.
Heat milk to scalding (just when steam starts to rise off the milk) and pour over the bread and cranberries. Stir just enough to combine. Set aside.
In another bowl, mix the eggs, sugar, nutmeg, vanilla and orange zest. Pour into bread mixture and stir to combine.
Pour mixture into greased casserole dish and bake at 350 degrees for 40-50 minutes or until a knife inserted in the middle comes out clean. Serve warm. Refrigerate leftovers.
I didn't make a topping or glaze for this one, as it was just wonderful with the cranberry and orange flavor.
Handmade Wheat Bread
Our family loves homemade bread. Long ago I used to make mine a loaf at a time, when I had the time, in a bread machine. Once I tried making bread by hand though, I was hooked! I now make bread 2-3 times a week and make about 3 loaves at a time. It really doesn't take that long once you get the hang of it. Here's our favorite recipe for Wheat Bread.
I mix my recipe around a bit, depending on what I have on hand. If I'm running low on grains, sometimes I'll make this as a white bread recipe. I usually make it with white and wheat flour at least and sometimes I'll also add spelt or kamut to the recipe to make a multigrain bread. Here's my basic recipe:
Handmade Wheat Bread
6 cups unbleached flour*
2 Tablespoons wheat gluten
1.5 teaspoons salt
2 cups water at approximately 105-110 degrees**
1/3 cup sugar
2 Tablespoons yeast
1/4 cup oil
* For the flour, I usually break it down to 3.5 cups of King Arthur Special with malted grains. It is an unbleached flour that makes wonderful bread. To this I add 2.5 cups of whatever grain I want to grind myself that day - usually wheat, but sometimes spelt or kamut. Sometimes I use a combination of any two or even all three different grains. The dough will rise best with at least 3.5 cups of the flour being the King Arthur or whatever your favorite unbleached flour is to use. You'll notice I add wheat gluten to help the dough rise when I use the wheat or spelt or kamut.
**For the water, I use 1 cup of water at the desired temperature and 1 cup of kefir whey.
In a 4 cup mixing bowl, combine the water, yeast and sugar and mix well. Allow to set approximately 10-15 minutes to activate the yeast.
In a large mixing bowl, combine the flour(s), salt, and wheat gluten. To the activated yeast mixture, add 1/4 cup of oil (I use organic canola oil or a light olive oil or sometimes a vegetable oil) and mix well. Stir into the flour mixture until well combined and then turn out the dough onto a well floured surface.
Knead the dough well by adding additional flour, about 1/4 cup at a time, until the dough becomes a soft, silky ball. This usually takes about 10 minutes or so.
Place the dough into a lightly greased bowl and cover with a smooth cotton towel. Place in a warm place until the dough doubles in size. I put mine in my oven with the light on for about 2-3 hours.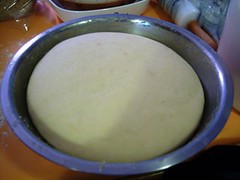
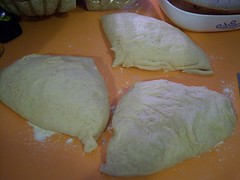
Once the dough has doubled in size, turn it out onto a lightly floured surface, punch down and divide into half or thirds. If my dough has really risen well, I'll divide it into thirds and make 3 loaves. If it is not rising as well as I'd like, I divide it into half and make 2 loaves. Every day is different when you make bread - humidity, temperature, your flour, all play a part in how your bread turns out. Some days it will rise better than others.
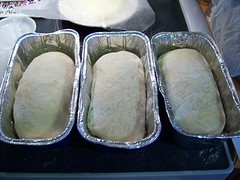
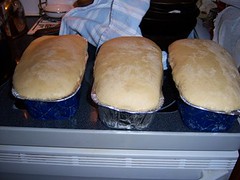
Okay, here I don't knead the dough again, I just turn the corners and shape it into a nice little loaf. Put the loaves into lightly greased loaf pans and cover. Allow to rise until the dough is about 1/2 inch above the top of the pan.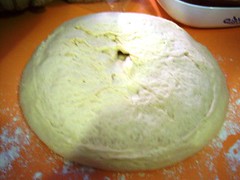

Heat your oven to 350 degrees and put the loaves in the oven. Bake for 30 minutes. They will be nicely browned. Turn out immediately onto a wire rack to cool so the bread doesn't get soggy. Wait until they are completely cooled before wrapping. I keep mine wrapped in foil so they don't dry out too quickly. Usually, we can go through at least 1 loaf a day, so they don't last too long anyway!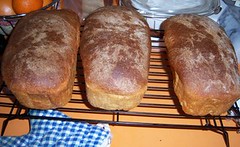
If you try this recipe - let me know how it turns out, especially if you make any changes or additions I might like to try with mine!
Making Buttermilk, Sour Cream and Cream Cheese
I like to use buttermilk for a lot of my baking - things like biscuits, scones, bread and muffins all have a great texture and flavor when I use buttermilk. I do not, however, like to buy buttermilk at the store. So, we make our own.
We use Kefir Grains to make a soured milk called Kefir - it is much like buttermilk. I purchased a 1/4 cup of the live grains through the mail. When they arrived, we put them in a glass 1 quart jar and added about a cup of whole milk from a local dairy. The milk we use is pasteurized, but not homogenized so it still has cream that comes to the top.
After about 12 hours, we had our first cultured kefir. I strained the liquid through a strainer and put it in a glass jar in the fridge. We can drink this as a drink or use it as you would buttermilk for any baking. I then put the kefir grains back into a glass quart jar, add more fresh milk and start the process over again. We do this every day. For more great info about how to make your own kefir, visit the link here at Tammy's.
Now that we've been doing this a while, we have lots of kefir grains. They continue to grow and multiply and before you know it you could be making a gallon of kefir (buttermilk) a day! When our grains grow to the point where we have excess I either sell some of them or save them (if you are interested in purchasing kefir grains to start your own, please email me by visiting the Contact Me link in the header.
You can save them by drying out the grains and freezing them in a glass jar with powdered milk to protect them. They can usually be re-started up to 2 months after freezing them. You can also dry out the grains and keep them in a glass jar with powdered milk in the refrigerator. You can re-start them this way up to 18 months after storage. Saving some of the excess grains like this ensures grains for the future should something unforeseen happen to my current batch. Here's a photo of about a cup of grains that I've just rinsed and am starting to dry for long-term storage: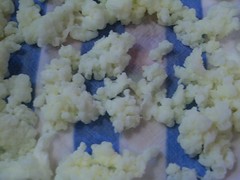
You can also pause your grains for up to a week by putting them in milk in a glass jar in the refrigerator.
We also use the kefir milk to make our own labne (sour cream) and cream cheese. Once I've strained the liquid off the kefir grains, I line a strainer with a sturdy cheesecloth that I've moistened. I put the strainer over a pot and pour the liquid kefir milk into the cheesecloth.
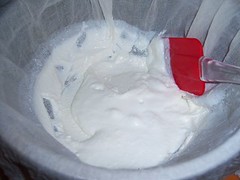
Depending on the amount of liquid, sometime in about 8 to 12 hours you get a cheese texture in the cloth similar to sour cream. Leaving it longer allows it to dry even more and it takes on more of a cream cheese consistency. Here's a batch I'm making for sour cream today. This is how it looks when I first pour the kefir milk into the cheesecloth, then when it is ready as sour cream and a final of how the sour cream looks when I put it in the container: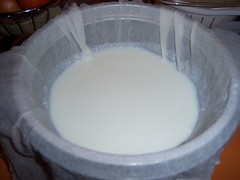
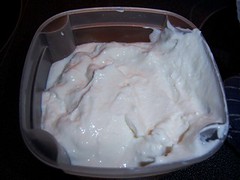
If I had let this set a few more hours, it would have dried more and been the consistency of cream cheese.
When I end up with more kefir milk in the fridge than I need for baking or drinking, I sometimes take 2-3 quarts of it and make the kefir cheese.
I also save the whey that is left from making the cheese. This I use in baking also, especially when I want something with a really sour taste. When I make my artisan bread, I often substitute most of the water with kefir whey and it gives the bread a delicious sour dough flavor without using sour dough starter. I also use the kefir whey in my regular loafs of bread. Sometimes I pour a little over the food for the dog, as it is excellent protein. There are a TON of uses for kefir whey.
This is how we make our own buttermilk, sour cream and cream cheese. I haven't had to buy any of these products in several months. I do have to buy the milk to keep the kefir growing. The milk we prefer to use from a local dairy is $3.89 per half gallon. I can use anywhere from 1-3 of these half gallons per week, depending on how much kefir we are making. So, it might cost a little more than purchasing sour cream or cream cheese would, but I'd prefer to know the origin of the milk that I use in these products than just buying whatever is on sale this week at the store that often has added fillers and ingredients.
Have you ever made kefir? Does this sound like something you'd enjoy doing or would you get tired of keeping up with it every day? I'd love to hear your comments!